
☐ Use fresh atta (wheat flour)
☐ Add 1–2 pinches of salt
☐ Use lukewarm water only
☐ Add water gradually
☐ Dough should be soft, smooth, and non-sticky
☐ Optional: add ½–1 tsp oil or ghee for extra softness
☐ Cover with a damp cloth
☐ Rest dough for 20–30 minutes
☐ Make even-sized dough balls
☐ Smooth surface, no cracks
☐ Lightly dust with dry flour
☐ Rest dough balls for 2–3 minutes before rolling
☐ Roll evenly from center to edges
☐ Keep thickness uniform
☐ Rotate dough while rolling
☐ Use minimum dry flour
☐ Shake off excess flour before cooking
☐ Use a clean, thick-bottom tawa
☐ Tawa should be hot, not smoking
☐ Water drops should sizzle and evaporate quickly
☐ Cook on high heat while roti is on tawa
☐ Lower heat between rotis to avoid burning the tawa
☐ Place roti on tawa gently
☐ Flip when small bubbles appear
☐ Light brown spots on both sides
☐ Press lightly with a cloth (edges first)
☐ Rotate roti while cooking for even heat
☐ Roti should puff up fully or partially
☐ Remove roti immediately when cooked
☐ Optional: apply light ghee while hot
☐ Stack rotis neatly
☐ Cover with a cloth or lid to retain steam
☐ Serve warm for best taste
✗ Cold water for kneading
✗ Too much dry flour
✗ Cooking on low heat
✗ Overcooking
✗ Leaving rotis uncovered
Dough is prepared in many ways and with many ingredients, but in this blog, we will focus solely on the art of dough preparation for flatbreads like chapati and roti. These timeless staples hold a cherished place in cuisines worldwide, celebrated for their versatility and simplicity. Crafting the perfect flatbread dough is a skill that can elevate your culinary creations and provide a delightful base for a variety of dishes. Whether you're looking to whip up a quick meal or impress guests with your cooking prowess, mastering the dough preparation process is essential.
In the following sections, we will explore the essential ingredients that enhance your chapati experience, ensuring your flatbreads are both flavorful and nutritious. We will also provide you with a step-by-step guide to effortlessly crafting the perfect roti dough, so you can enjoy homemade flatbreads that are soft, pliable, and ready to complement any meal. Let’s dive into the fascinating world of dough preparation and discover the keys to achieving flatbreads that enhance any dining experience!
Exploring the art of dough preparation for flatbreads
Dough preparation is a beautiful blend of science and art, especially when it comes to flatbreads like chapati and roti. Each recipe reflects cultural traditions and regional flavors, showcasing the versatility of this simple yet profound staple. While the process may appear straightforward, the nuances involved in kneading, resting, and cooking the dough can significantly impact the final result. Mastering the art of dough preparation empowers home cooks to create delicious, soft, and perfectly cooked flatbreads that can elevate any meal.
Understanding the various methods and techniques helps you enhance your dough preparation skills. From selecting the right flour to knowing how much water to add, the intricacies are what separate a good flatbread from a great one. As you experiment with different kneading techniques, resting times, and cooking methods, you’ll discover your unique approach to crafting the perfect dough. This blog will guide you through the essentials of flatbread dough preparation, ensuring that you not only create delicious chapati and roti but also appreciate the craft behind each bite.
Key ingredients that elevate your chapati experience
To create the perfect dough for chapati, the choice of ingredients plays a vital role. The foundation of your chapati begins with high-quality whole wheat flour, also known as atta. This flour boasts a fine texture and high gluten content, which contributes to the dough's elasticity and ensures that your flatbreads puff up beautifully when cooked. Additionally, consider adding a pinch of salt to enhance the flavor and provide a subtle depth in taste. Some enthusiasts even opt to blend a small amount of all-purpose flour with whole wheat flour for a lighter texture. Choose your ingredients carefully, as they will significantly influence the taste and quality of your chapati.
Incorporating water is the next crucial step in your dough preparation. The temperature of the water also matters; warm water often helps the dough bind more effectively, resulting in a smoother and more pliable texture. Moreover, adding a teaspoon of oil or ghee to the mixture can further elevate your dough, imparting richness and a lovely softness to the chapatis. Throughout the dough preparation process, aim for the right balance—too much water will make your dough sticky, while too little will yield a dry and crumbly texture. Taking these considerations into account ensures that every chapati you create is not just a flatbread but a delightful culinary experience.
Step-by-step guide to effortlessly crafting perfect roti dough
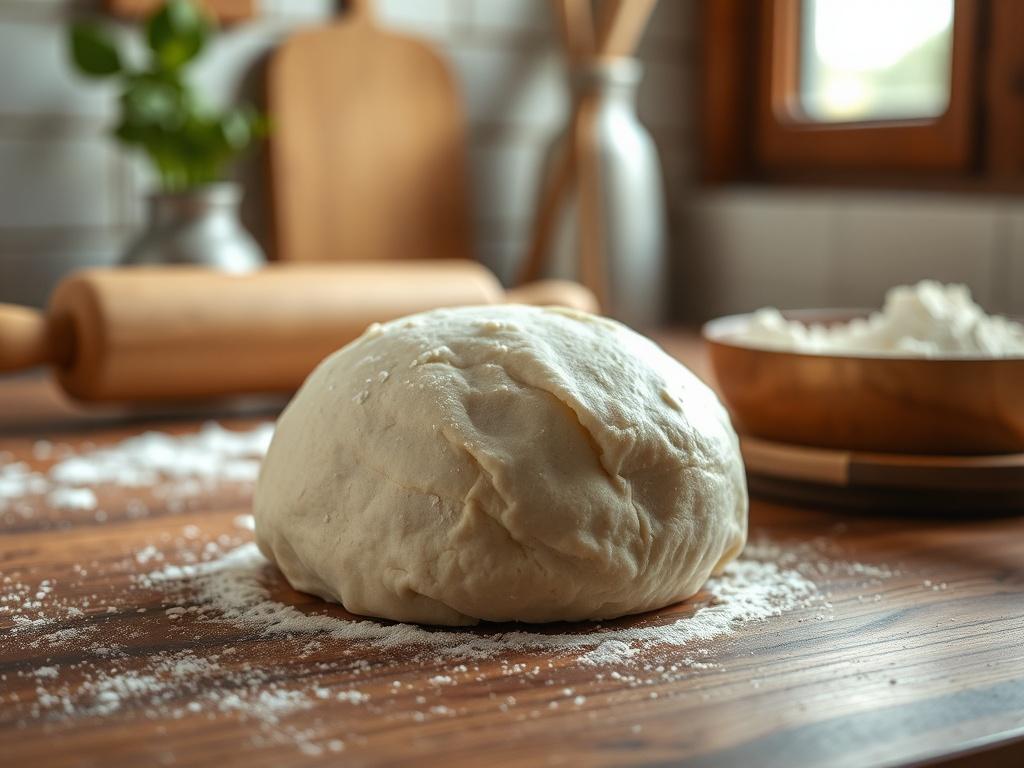
Creating the perfect roti dough requires attention to detail and a few simple steps. Start by measuring out the desired amount of whole wheat flour and pouring it into a large mixing bowl. Next, add a pinch of salt to enhance the flavor. Gradually incorporate water, adding a little at a time while mixing with your fingers or a dough scraper. Knead the mixture until it forms a soft and pliable dough. This process usually takes about 8 to 10 minutes, so be sure to use the palms of your hands to work out any lumps for a smooth consistency. If you desire an even softer dough, consider adding a teaspoon of oil during the kneading process to lock in moisture.
Once the dough is well-kneaded, cover it with a damp cloth or plastic wrap and let it rest for at least 20 to 30 minutes. Resting allows the gluten in the flour to develop, which creates a better texture for rolling. After the resting period, divide the dough into equal-sized portions, shaping each piece into a small ball. Flour your rolling surface and gently flatten each ball with your fingers before using a rolling pin to create a thin, even circle. Keep the dough lightly floured to prevent sticking, and aim for a uniform thickness. A well-prepared roti will cook evenly on a hot tava or skillet, resulting in a delicious, soft flatbread that complements any meal!